Showing posts with label inspiration. Show all posts

Friday, July 29, 2016

Guest Post: Elephants For Education

Last year we learned about a charity I have supported since 2012, Human and Hope Association in Siem Reap, Cambodia. This month Human and Hope made the transition to being entirely Khmer operated, and I recently had the chance to catch up with my friend, Sally, who successfully made herself redundant from her role.

This month Human and Hope have launched a new crowd funding campaign called Elephants For Education. 


Congratulations on finishing your role at Human and Hope! How do you feel?

I feel so proud of the achievements of my team, but if I am speaking honestly, I really do miss Human and Hope a lot. I keep comparing my departure from the organisation to how a parent must feel when their child leaves home!

Why was it important for you to make Human and Hope entirely Khmer run?

The reason I joined Human and Hope Association was to help the organisation and staff reach their full potential, then step back. Admittedly, I was naïve at the beginning and thought it would take a year. It has taken almost four years and a LOT of hard work. However, it was worth it as I truly believe that local operation of NGO’s is the way to move communities out of poverty.

The biggest reasons that we believe local organisations should be run by locals is because of empowerment and sustainability. We believe that local people are the subject matter experts, as they are the ones who know the country, culture and traditions best. By promoting team work amongst the locals, they can learn from each other and not become reliant on foreigners. Having volunteers come and go isn’t sustainable. What IS sustainable is training local staff, who can in turn, train more local staff as part of a succession plan.


Tell me about your new crowdfunding campaign, Elephants for Education?

This is something I am SUPER excited about! Our key project at Human and Hope is educating children between the ages of five and 18 so that they can break the cycle of poverty. In order to do something different to raise funds to educate our 150 students in 2017, we have launched a crowdfunding campaign titled Elephants for Education. By pledging funds, supporters can purchase their own stuffed elephants from just $25, with postage included in Australia!


These 10 different elephants are made by our graduated sewing students in Cambodia, so not only are you supporting the education of children with your purchase, you are also providing a fair wage to a Cambodian woman so she can support her family! Not only is each elephant super cute, but each one has their own name. For example, Bopha can provide a whole month’s English education to a child, and Amao Jr. can provide a month of clean drinking water to all their students!


Why is education in Cambodia so important?

Between 1975 and 1979, an estimated two million people (a quarter of the population at the time) were killed in Cambodia through starvation, torture, execution, disease and overwork under the ruling of the Khmer Rouge. Intellectuals were targeted, and as a result, Cambodia lost most of their educated population.

It has taken a long time to rebuild Cambodia, and although the education system has developed in leaps and bounds, there is still a strong lack of education and skills in our community that has led to a life of poverty for our villagers.

With poverty comes other social issues, such as lack of hygiene which results in increased illnesses, domestic violence, and child labour. We work directly with children and their families so that with our support they can understand the value of education and help to address these social issues. We want them to break the cycle of poverty so that the next generation don’t have to deal with the hardships that this generation does.

By educating our students we are empowering them to create sustainable futures for themselves.


To purchase an elephant for $25 with shipping included in Australia, visit Human and Hope’s crowdfunding campaign.

Make sure to follow them on Instagram (@humanandhope) for exclusive giveaways during the campaign!


Wednesday, July 22, 2015

Scrap It: PinkFresh Studio

Today I'm stopping by with two pages using the PinkFresh Studio line 'Up In The Clouds', that was added to the shop this week.

Lately I have been scrapping a lot of photos from my childhood, and the PinkFresh designs are working perfectly. Fun and bright, they blend graphic patterns with hand drawn designs for a vibrant, youthful feel.

Picture Perfect by Tracey Kinny | Dizzy Izzy Scrapbooking

My cousin and I are in our matching Cabbage Patch Kids dresses to celebrate my 6th birthday. I decided that the Dear Lizzie 'Daydreamer' stamps would work perfectly, so I used watercolour pencils to make her match, then did a bit of fussy cutting.


It's not all 80's glam for this line though, as you'll see it also lends itself to more recent photos, like these photos from my friends wedding. The touches of watercolour and gold foil journal cards and rub ons certainly add to the romantic feel.

Live & Love by Tracey Kinny | Dizzy Izzy Scrapbooking

I'm very into watercolour at the moment, but I'm even more into it when I don't have to clean up the mess and wait for it to dry!  Plus, I just LOVE their metallic washi tape, don't you?

Happy Scrapping,

Tracey xx

Supplies for 'Picture Perfect' layout: PinkFresh Studio Papers: Bird House/Star Sprinkles, Colourblock/Feathers, Diamond Cloud/Cofetti; PinkFresh Studio Foil Cards, Studio Puffs, Washi Tape; Dear Lizzie Daydreamer Stamps; Misc: foam tape, sequins & stamp.


Supplies for 'Live & Love' layout: PinkFresh Studio Papers: Matchstick Geo/Live and Love, Triangle Blocks/Circle Abstract, Diamond Cloud/Confetti; PinkFresh Studio Foil Cards, Fresh Drops, Metallic Rub Ons, Washi Tape, Misc: foam tape.

Tuesday, July 21, 2015

Guest Post: Human & Hope

At many of our events, we have collected donations of unwanted craft supplies that are sent to Cambodia to be used by my friend Sally at Human and Hope Association with their children's programs. Today we have a guest post from Sally, talking about their very successful sewing program. 

Breaking Down Barriers to Sew

When Saney was in her early 20’s, she dreamed of being a seamstress. However, for someone living in poverty and only having enough food to eat twice a day, this dream was out of reach for her. Fast forward to when she was 28 years old, Saney’s neighbour told her about a new sewing program at an NGO she had just graduated from. Eager to study, Saney asked her husband for permission. He said no. She asked again. He said no. She continued to persist until her husband eventually agreed for her to study in the year long sewing program at Human and Hope Association in Siem Reap, Cambodia.

Saney’s story is not unique. A big challenge we face in recruiting students into our sewing program at Human and Hope Association is their families. Coming from families classified as the ‘poorest of the poor’, our students’ relatives (and also the students themselves) often don’t understand the benefits of education. It is a hard concept to grasp, that studying for a year will enable them to gain a skill that can move them out of poverty when all but one of our sewing students never even finished primary school. Our students’ families see the program as a waste of time, especially when they need money immediately to pay for basic living costs.


This is where our daily stipend comes in. We provide our students with 1kg of rice a day in return for them studying with us three hours a day, five days a week. Our sewing students also have a patch of land at Human and Hope Association which they are responsible for taking care of. We assist them by teaching them chemical-free farming techniques (unusual for Cambodia) and when the vegetables are ready they receive them instead of rice. Fully involving our students in our program, from feedback sessions to life skills workshops to bringing back successful sewing graduates is what is needed to engage them and retain them in our program. I am not going to lie; it is tough going. We have lost very promising sewing students due to the pull their families have over them, the need to move to Thailand to earn an income (as they see this as the only option) or health issues.


However, our team don’t give up. This is because we have seen first hand how our sewing program transforms lives. The students who complete our program have increased confidence, the ability to earn an income through machines they borrow through our microfinance program and a better understanding of how to overcome personal issues they are bound to face.


Our most outstanding students are chosen to be our seamstresses and make products for us, earning a fair wage and also reaping the benefits of employment with Human and Hope Association, such as constant development, even after they graduate. Their confidence continues to increase as they learn how to make new products, apply their creative flair to existing products and see the photos of happy customers who buy their work.


It is a long journey these marginalised villagers face, but with our support and their commitment, they will reach their end destination; moving out of the poverty bracket and ensuring a better future for their children.


To purchase Human and Hope Association’s products please visit our online store. All income supports the payment of fair wages to our seamstresses and funds our education, vocational training and community support projects. 


To keep updated with what we are achieving in our community, please like us on Facebook 


For further information on how you can support the empowerment of Cambodians, 
please contact me at 

Wednesday, August 6, 2014

Project Preserve The Memories: Get Creative

In this final part of our Project Preserve The Memories series, Kristen gets creative!
Many thanks to Kristen for detailing her journey so thoroughly, and for sharing it with us. We hope that you have been inspired to jump in and get some photos into albums and document your story as well!

If you have missed our earlier posts in this series, you can check them out here

Step 10 – Be Creative With Layouts & Pocket Pages

Just because you are using a ProjectLife© Core Kit and pocket pages doesn't mean you can’t also throw in some full-page layouts when the photos call for it. Larger prints or odd sized photos and memorabilia are perfect for this!


You may also find yourself with one or more photos that ‘just won’t fit’ into any pocket page you have. This might be because it is the wrong orientation, or you have 10 photos and 9 pockets. Or perhaps you just don’t have a pocket configuration that suits that particular set of photos. Whatever your needs, think creatively about what you already have in your stash!

My We R Memory Keepers 9 pocket pages have vertical pockets, I have a collection of landscape photos. What to do...?
Here’s a couple of ideas...


In the example above, I simply rotated my pocket page to create landscape orientation pockets, trimmed off the excess 1.5” with my craft knife and ruler (so it ended up the ‘right’ width for my album including the same 1” margin as my other pages), punched some new holes and PRESTO I had exactly what I needed!  


Your page sizes don’t all need to be the same either, as long as they don’t overhang your album. In my 8.5x11 album I’ve used 5x7, 6x4, 6x6, 8x8 and even 4x4 (We R Memory Keepers instagram) page protectors for ‘mini layouts’ for 1 or 2 photos.


If trimming down a 12x12 page to create what you need, don’t throw away the excess you’ve trimmed off. Turn it into another mini insert! The spaces will be 6x4 or 3x4 in size if you have trimmed closely, so pop in some cards and photos and punch straight through if you don’t have excess for a margin to punch the holes in.


Step 11 – Adding Extra Photos

As family and friends see the album that you are creating, you will invariably find yourself the recipient of ‘extra’ photos that they have that belong in your album. Or perhaps as you work through you will discover photos that you missed previously tucked away.

Creating smaller ‘filler’ pages (using the techniques above) is the perfect ‘no-fuss’ way of quickly adding these extra photos. Simply pop them into the correct section of your ring-binder album, without the need to redo any of the pages you have already done.


I hope you have enjoyed getting started on your journey of preserving your memories as much as I have enjoyed sharing mine with you! We’d love you to share your own story with us, or photos of layouts you’re creating to preserve your memories. You can do this via our Facebook page or email them to us at dizzyizzyscrapbooking@gmail.com

Happy Scrapping!

Kristen
#ProjectPreserveTheMemories

Tuesday, July 29, 2014

Project Preserve the Memories: Journalling

Today we are continuing Kristens Project Preserve the Memories by getting into the storytelling and 'pretty' portion of the project: journalling & embellishing. Read on....

Step 8 – Journalling

In all honesty, journaling is the key to this whole project! The stories behind the photos are as precious as the photos themselves. If you are fortunate enough to have the stories/dates/locations/names recorded (or still have someone who can recall them for you) take the time to note them down. Voice record them. Anything!!
If you only have names, then some quick research might reveal a few extra details. A search of Birth, Death & Marriage records online gave me names, dates and locations for my Great- Great- Grandmother’s birth, marriage, children and death.  

Early photos have wonderful stories attached and I'm grateful my dad is still able to recall them for me, to preserve along with the photos.


Journalling onto cards as part of your layout is wonderful, but sometimes space or sensitive and private stories may require a little more creative approach. Some details of life are worth recording, but not necessarily displaying (so I've popped them in a LIFE pocket here). Pull-out journal cards can add a bit of fun too!

If you don’t have the information you need on hand, leave spaces (or pocket tags) where you think you may be able to add journalling later. The beauty of Project Life cards is that they look great left blank (as fillers) but could be journalled on later if a new story reveals itself. I have also intentionally left pockets empty on most pages (with a lovely filler card of course) in case any new photos materialise.


Handwriting... yes, handwriting. This is a source of discontent for many scrapbookers!

Although you may not like your own handwriting, I encourage you to use it!! Here’s an example... I asked my Dad to journal for this layout – the story of his dad being a butcher during the WW2 years. My dad’s handwriting is far from beautiful, but I love it. I love it because he wrote it. And I love the extra ‘touch’ it adds to the memory, the story and the layout.


I'm pretty sure that in years to come, those who read my scrapbooks (and yours) will feel the same... about OUR writing. So go ahead – put aside your own opinion of your handwriting and how it looks, and USE IT... because those people you scrapbook for will LOVE IT!!


Step 9 – Embellishing

The best thing about ProjectLife© Core Kits is that they are beautiful just as they are. And there are a variety of other brands now being released with hundreds of ranges to suit any purpose. Simply by using these, your ‘layouts’ will look complete. There’s no need to embellish further... unless you want to.
I am a scrapbooker at heart, and I love those pretty touches and depth that embellishments add, so I have included a sprinkling of them throughout this album. Nothing sharp and nothing too bulky though, and always paying attention to what photograph is on the other side and facing page (because they will press together when the album is closed).
Simple embellishments like paper or fabric flowers, buttons, die cuts and washi tape are perfect!


Our next post will be the conclusion of our series! Stay tuned!

Kristen xx

Wednesday, July 23, 2014

Project Preserve The Memories: The Fun Stuff

This week we return to our journey of Preserving The Memories! Kristen is back to help you with the next steps in your journey - now we are getting into the hands on scrapping!

So far we've put in A LOT of hours of preparation - removing photos from unsafe storage and albums, sorting, scanning and hunting down other keepsakes that belong with the photos. So now it’s time to get started on the FUN STUFF!

STEP 6 – Select your Tools Of The Trade!

The sense of relief I felt when I realised the difference that ProjectLife© was going to make to this project was enormous! I had put this off for so long, not sure of where to start and daunted by the enormity of ‘scrapbooking’ all of these photos... fitting dozens of teeny tiny photos onto a 12x12 page... papers... embellishments... Suddenly it was so straightforward, quick and easy!

After sorting your photos you will have a good idea of what sizes you are working with. And once you know what you’re working with you can choose pages that will suit well, and the corresponding size ring-binder album. The beauty of ring-binder albums (like the ones available from Dizzy Izzy) is that you can use any combination of pages in them and move them around as the need arises.

Because I had a lot of smaller vintage 2x3 photos I was thrilled to discover the We R Memory Keepers 8.5x11 pages purpose designed for this size! And the matching 8.5x11 full-size and divided pages complement perfectly for larger photos or ‘traditional’ layouts as well.

Quick Tip - Whatever size you go with, keep a variety of pocket pages handy, and draw up and print a ‘cheat sheet’ of the different configurations you have, for quick reference when you need to choose the right page for your photos. This will save you time as you work later on ;)

Then go ahead and choose a ProjectLife© Core Kit to use. These kits come with everything you will need to complete a whole album, with over 600 cards in a variety of coordinating designs. There is something to suit ALL styles and colour preferences, including a Heritage Kit, but I went with Cinnamon because I loved the colour palette and style of the cards. I also matched up some plain cardstock that I had in my stash, and set this aside for easy access when creating full page layouts. Packs of 12x12 paper to match the Project Life kits are also available for this purpose.


Step 7 – Start on the FUN STUFF!

Once you have the basic supplies you will need, start to work your photos into pages. The 3x4 Project Life cards are perfect for trimming down for smaller pockets and backing tiny photos so they fill the pocket and don’t slide around.

Because I'm working with the original photos (some people prefer to work with reprints from scans) I choose not to trim or crop any of these at all. But if working with reprints you have full freedom to print and crop to any size you need. (You can always print another copy if something goes horribly wrong). 

You can adhere your photos in many ways (double-sided tape, dots, washi tape) but I have opted for photo corners (again, because I’m working with the original photos) so they can be removed easily if needs be.


Coming up next... Journalling!

Sunday, April 6, 2014

* SPARKLE * FABULOUS * - Heidi Swapp Fun

Hi everyone,

Thought I would stop by and share a little bit of fun I have been having with some Heidi Swapp products.

I created this layout from photos taken in a photobooth at Jodie's 30th birthday party. They were such a great memento and I loved being able to use so many on my layout.

The Heidi Swapp products are fun and vibrant and were the perfect match for these photos. I used papers from both her Colour Pop and Serendipity lines.


I used the Heidi Swapp buzzwords for my title- they are so easy to add to any layout or project life page and come in a variety of styles.


The buzzwords are self-adhesive stickers and come with words and detailed embellishments such as this arrow and the leopard print heart.  I added sewing thread for some extra texture. To adhere the thread I tucked one end under my flair then ran a bit of glue along it using my finger.


I also used some of the Heidi Swapp Jumbo Pennants. I've been wanting to play with these for a while and they were a lot of fun to play with. The banners are white to begin with, then using your inks, sprays or mists you can colour them to suit your project. The pattern on the banner resists the spray so they still have the same detail as the original white banner.  I used Heidi's Primrose Colourshine Mist and Squeezed Orange Dylusions on my banners. I also used these sprays to create the splatter effect as seen above.  As the banners were a bit longer than I needed I cut the tops off to use on other projects.


 I think Heidi could coin a second catchphrase "Make Cute stuff!"


All Heidi Swapp products are currently 20% of in the webstore until Sunday 13th April.

Fleur xx

Tuesday, April 1, 2014

Project Preserve The Memories: Organisation

 Next in our series from guest blogger Kristen Cairns we learn about the importance of organisation when starting a project as huge as #ProjectPreservetheMemories. Read on....

Welcome back to my family memory keeping journey. I hope you are becoming inspired to get stuck into preserving those precious photos and memories – both old and new!


So far on our journey we have smiled as we are presented with copious amounts of family photos in varying states of storage and repair! We have then dedicated a few (or more) hours of time to removing these photos from their unsafe previous homes… and now what?
Well, this is the point at which it is easy to become overwhelmed. Where do I start? What on earth was I thinking? And (my own favourite) Who on earth put these photos in here and what sort of order is this?!?!

Which brings us to Step 3 – Sort Your Photos

I'm going to be completely honest – this CAN be time consuming, but the cost benefit is great! As in - the benefit of doing this properly at the beginning will reveal itself once you get into the ‘creating’ stage. Things will become quicker and easier! I promise ;)
There is no right or wrong way of doing this – whether chronologically (if you’re lucky enough to have dates recorded), or by people, families, groups, events, eras… Whatever you feel will make it easiest to record the stories and memories.


The photos you have received will often be mixed up in multiple albums/ boxes/ packets, and even multiple albums (belonging to different people) of similar photos. This ‘sorting’ step will make the scrapping process quicker while also lessening the chance of finding ‘extra’ photos later on after those pages have been completed! (Although the ProjectLife© system does allow for this – more on that later).

Sort your photos out – commandeer the dining table for a weekend if needs be – and give yourself plenty of space to create ‘piles’. Make a note of any of the information or labels from the albums, onto post-it-notes, and stick these with the photos, along with any other memorabilia. Don’t forget to check the back of photos for handwritten notes. When sorting, make a separate pile for photos that you have ‘no idea’ about, to come back to later on. You’ll be surprised at how you might recognise a background, an outfit or a group later on, and be able to reconnect some of these ‘lost’ photos. And if you can’t – maybe someone else can. If not, they are still a lovely inclusion, showing people, places, fashion trends and a general glimpse into the life and times of the day.


Step 4 – Gather the Memories

I hesitate to call this ‘Step 4’, because truthfully this is something that will continue throughout the entirety of the project. But now is as good a time as ever to begin!


Once the photos are sorted (or even as you are working through this), begin to collate the stories around the photos. Do you have other items – birth/death certificates, marriage certificates, newspaper clippings, receipts, lists, handwritten notes? Bundle these up with photos of the event/people concerned.


Make the most of any remaining older relatives – you may be surprised at what they remember and how happy they are to share their stories, recollections and insights. Making this a group effort certainly adds something to the journey ;) Using a voice recorder to talk through the photos creates an additional priceless memento! Number your photos if doing this, so you know which story belongs to which photo.

Step 5 – Scan & Store

Because these precious photos can’t be replaced, it’s important to scan them for sharing as well as security. Scan your photos at the highest possible resolution (at least 300 DPI or more), to allow for good quality reprinting. If you don’t have access to a scanner, a friend may have one you can borrow. Alternatively some stores will allow you to use their scanners (eg Officeworks) and save the files on a CD. Your local historical society may even have equipment that you can access to do this – along with some good advice and friendly assistance with the process, from people who value this type of pursuit!

When scanning, try to name the photos as you go. You might even like to sort the digital photos into ‘folders’ matching the way you have sorted the actual photos, to make them easier to find later on. Then give a copy of the scanned photos on disc to other family members and keep a couple of backups yourself, in different places “just in case”.

Some of your photos may well be in need of repair and editing, before being reprinted. This is the perfect time to call in a favour and let someone ELSE in the family contribute to the project ;) If you have a few clever family or friends, you could share the packets around, and if not there are also commercial services who specialise in this type of work.


Once you have scanned them, store the sorted photos in a way that makes them easy to see and use. Index card boxes, a folder or envelopes would work, but I have chosen to use ProjectLife© pocket pages in which to store my ‘piles’. 


There is a wide range of these available from Dizzy Izzy! And the beauty of doing this is that I can store all of my sorted photos in the same album binder along with the pages I have completed. This has also helped me work out what size album will work best and what configuration of pages will suit my photos.

Kristen

Saturday, March 22, 2014

The Class That Keeps On Giving

At our last October Retreat, Kate taught a very popular class titled 'Magic'.

The page layout used Simple Stories papers from the 'Say Cheese' collection, which you may notice draws some inspiration from a certain theme park.

Our lovely customer Carolyn loved the class kit so much she has been emailing us with the pages she creates with the left overs. As Carolyn says, 'Goes to show what you can do with a few bits n bobs n leftovers. It's the class that just keeps on giving!'


Carolyn's second page, next to her original class page (right)


I definitely agree!

Simple Stories papers and embellies are on sale in our webstore until Wednesday 26th March. Get 20% off by entering the code SS20 when you check out!

Tracey xx


Wednesday, March 5, 2014

Kit Highlight: Wedding Flowers

I have to get this right out of the way: I love this layout of Fleurs'.


I love the colours (green is my favourite colour), I love the paper used (BoBunny - so pretty!). The little touch of machine sewing is the perfect accent to mix with the 'natural' chipboard and the doily. The resist paper and butterfly are just right. And the little touches of green and gold (made by unscrewing the spray bottle and using the end of the mister like a pen) are heavenly!

You can find this kit here in our webstore - there are only 3 left!

Happy Scrapping!

Tracey xox

Wednesday, February 19, 2014

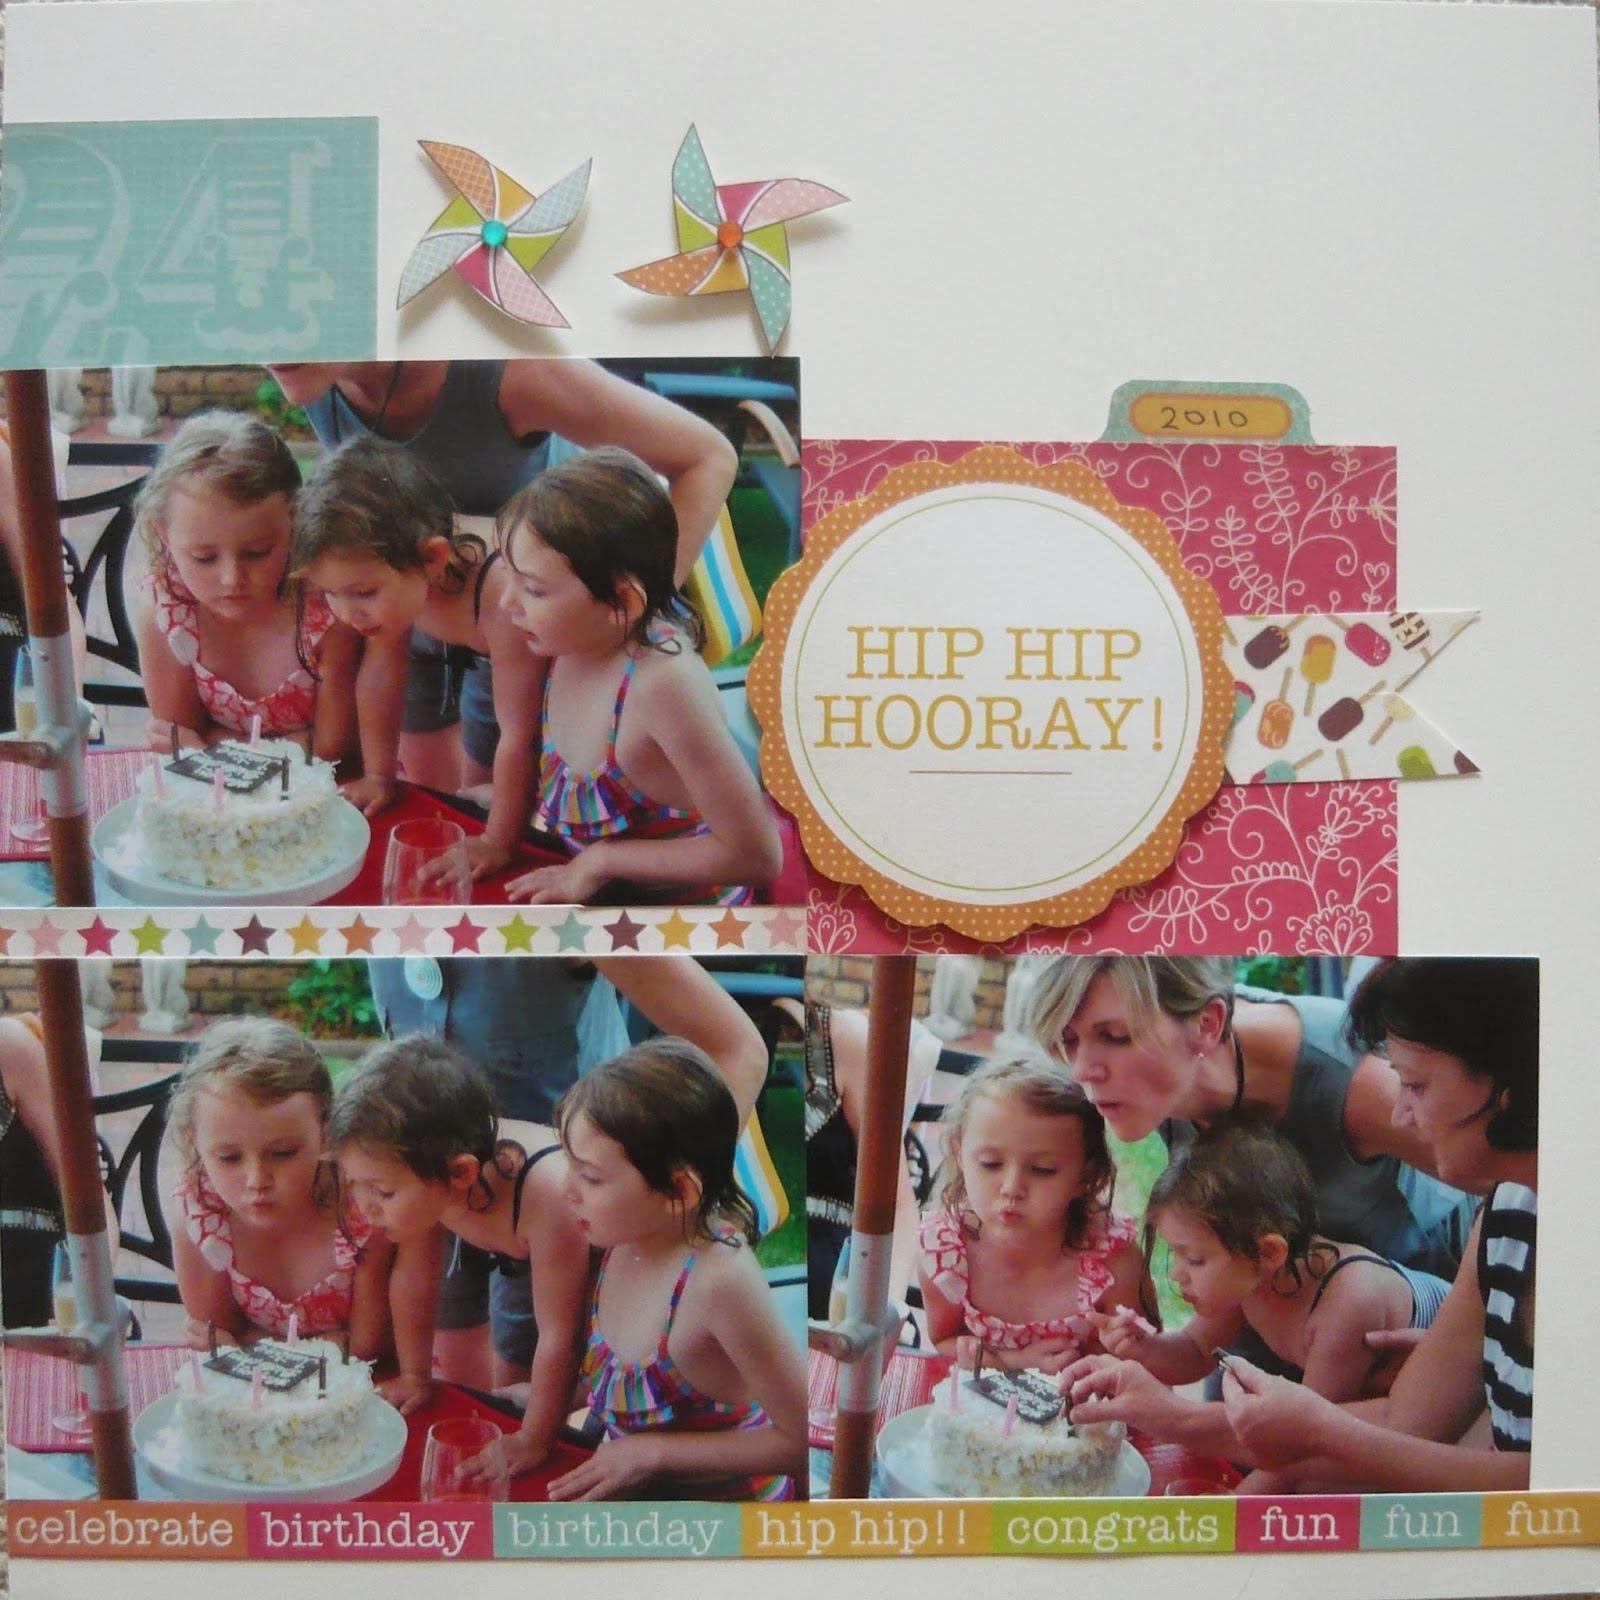
Kit Highlight: Hip Hip Hooray!

Today we are highlighting a birthday party themed layout that has all the best bits of parties: bunting, pin-wheels, lollies and cake!  Fleur has used Kaisercraft 'Save the Date Collection' paper and a hint of bling on this happy, multiphoto layout. If you always take lots of photos at parties, this kit is for you, with plenty left over to create a few extra layouts!


You can find this kit here in the webstore!

Happy Scrapping!,
Tracey

Tuesday, February 18, 2014

A 'Blokey' Christmas Present

I know I know, Christmas is over and here is a post about a Christmas present. So my heartfelt apologies that I am talking Christmas in February but I seriously feel as though its only December!

Its become a recent tradition in our family that the adults participate in a Kris Kringle when it comes to gift giving. It has become a really special tradition where we all really love and appreciate the year long thought that has been put into the present. When it comes to the gifts I like to give, it is usually something handmade by me.

For Christmas 2013 I drew my cousin's partner - they currently live in WA so I've only meet Russell a handful of times. Thankfully the wonders of a little Facebook stalking has given me a little insight into his hobbies and interests. Namely, cycling and triathlon, so I knew I had to do something for him along those lines - but I was super stumped as I am not great when it comes to doing 'Bloke' in my scrapping style. In fact I was a little stressed that I wasn't going to come up with the handmade goods, I thought he would simply have to suffice with a gift from the cycling shop. In the end persistence paid off and I made him his own one off album.


I was going to use the title 'tri-man' and show off photos from both his cycling and triathlon pursuits but Darling Husband vetoed that and I ended up limiting my photo selection to just cycling photos.


I used an Ali Edwards stamp to create the 'awesome' arrow and adhered it using a bit of mounting tape.


I think that Chevron's are particularly blokey! I love how with the acetate albums you can see your elements through the pages. I think it adds a bit of interest and its exciting to turn to the next page and see what's there. Its also pretty cool that you only have to stamp once and you can see it on the next page.


Geotags - another cool blokey element! I also really am in love with the word bubbles from WOW chipboard.


Here I've used another Ali Edwards stamp and cut it out them adhered it with mounting tape. I'm using a lot of stamps in my scrapping of late. It is just so using to create cool little embellishments using them. I've used the Pink Paislee Sentiment stamp in the picture below.


Stars and arrows were definitely the go in this album. On this last page I've used the the Luxe Chipboard Stars by Pink Paislee. Oh and the Papers are from Simple Stories 24/Seven range.

I'm really happy with how this turned out - in fact I'm totally stoked.... and despite the fact that Darling Husband said that the gift would only make an appearance to family on Christmas Day (thanks dear) it turns out Russell has shown it to his mates as well!

Happy Scrapping

Fleur x